Monday, September 5, 2011

Not so perfect crafter (and an apron pattern)

It seems there are 2 types of crafters. Those who strive to make something as close as possible to perfection and those who do not. I'm definitely more in the second category.

Martha Stewart, I am not.

Sometimes I think I should rename my blog something like "mistakes not to make in sewing" or "type B sewist". I'm not a perfectionist and I'm ok with leaving mistakes visiable, to a point.

When making something like pjs for my kids, I really don't care about mistakes, short of when I acidently sew the sleeve to the neck or something unwearable like that (yes, I've done it). When I make a mistake I first think, who will see this? Just my family, not such a big deal. Then does it effect the function or will I cringe every time I see it. If yes, I try to fix or cover it.

Some mistakes this week :)

I made another apron. This is Butterick  5263. I love aprons with full coverage. This pattern was written to be reversible (double layered) but I didn't want this. I didn't want the heat or to waste fabric. (plus, I didn't read the directions but I would have done this even if I did read them).  Often I use patterns just for cutting out stuff and I really should read more :)
Anyway, I found this super cute fabric in a remnant bin of a local store a few months ago and it YELLED "make me into an apron!" I wish I had more because I only had enough for the front.  Oh well.


I'm starting to think I'm required one stupid mistake per sewn item. So, for this item, my stupid mistake was cutting both pockets with the fabric facing  the same way. Yes, right sides together is how to do it and some how I managed to mess it up. Luckily, I had more of this fabric and fixed it.


mistake number 2 - when sewing FOE or binding, it's best to start at the same place on each pocket. Yes, another "oh-well".


I used some vintage buttons I got in a swap years ago for the back.


Overall, I love it. Nice full coverage and comfy.
So, modifications to this pattern:
- not reversible
- used FOE instead of binding for the pockets
- because it's not reversible, I turned & top stitched the edges.

Thursday, August 11, 2011

How to sew a kerchief


I've been asked by a few people to write up a step by step guide to cutting/sewing a triangle kerchief. Really, they are very easy but I understand some people are more visual. (This is a repost from my old blog).

At the end I will show how to make this into a rounded headscarf  - more like a veil.

My brown triangle tichel/kerchief that I am wearing in previous photos is a 36 inch square cut in half to make a triangle. This one is a little smaller, but another size I like. If you want to be able to wrap the ends up fully around the head in a crown tie, you'll need to make a larger sized one - probably at least 30 inches. I'd say maybe try measuring your head and seeing what the total length you need to go around your head in the fashion you desire. This will be the length of the long edge of the triangle. Once you get the basics of making these down, you can adjust and play with the shaping of your scarf to make it fit your needs and likes.

I like to use light weight/thin fabrics the best. One of my favorites is cotton gauze. Lately, I've been just trying to use up fabric in my overflowing stash.

First lay your fabric flat. To make cutting easier, I folded my fabric in half. If you wish to just mark the fabric, you can cut it without folding it. If you fold it in half, make sure you divide your desired width in half.

This one is going to be a square 28 inches wide (then cut into a triangle). So measure your width (over the fold) and then measure the length (same direction as the fold). Draw a line or cut directly using a rotary tool and ruler.


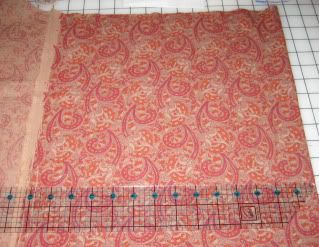
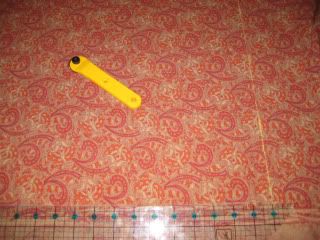
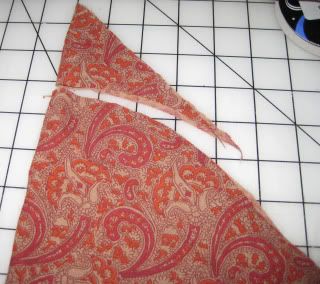
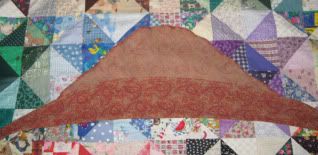
Now you have a square. Draw a line from one corner to the other and then cut - making 2 equal triangles.


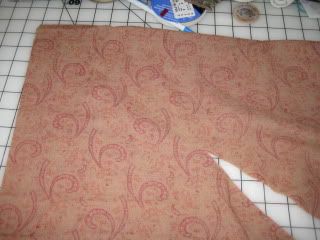
Now we'll work with one of the triangles.

I don't always cut straight when sewing for myself, so I fold it over and make sure it's even. If not, I'll trim the edge to make it even.


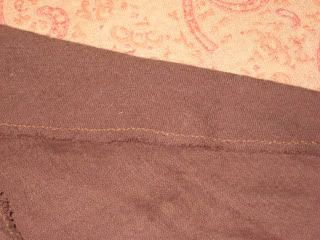
 The most basic thing is to just hem or finish the edges and leave it a triangle. For my brown one, which had no obvious right side, I just finished it with a narrow zig-zag stitch. I tried to show it in this photo by adjusting the color of my photo - use the same color thread so it blends :) . Gauze and many other light weight fabrics will frey (come apart) so you must do something to finish the edges. Sewing a zig-zag stitch around (ideally twice) will give it a rustic look more-so than a double pressed edge.


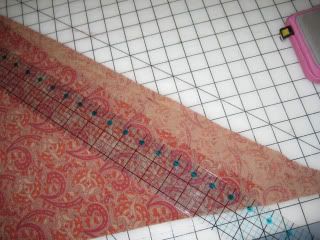
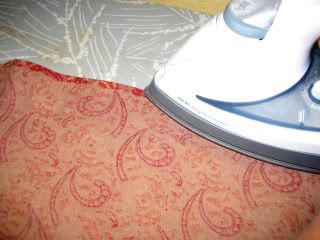
For the printed one I'm showing here, I am sewing  double pressed edge because there is an obvious right/wrong side. If you have a serger, you can do a rolled hem. Lay your triangle flat and iron a narrow hem. Then go around again, folding a second time, so you cannot see any raw edges. Then sew with a straight stitch. You can even do this by hand if you don't have a machine.


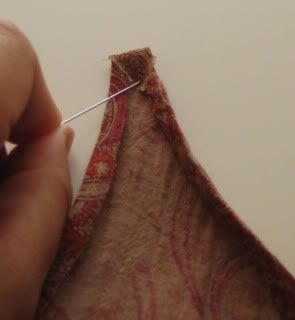
When you get to the corners, you may have to tuck in the edges or you will have long pointy, almost string-like, ends. I like to fold down the tip (sometimes even trim just a pinch off of it) and tuck it in.


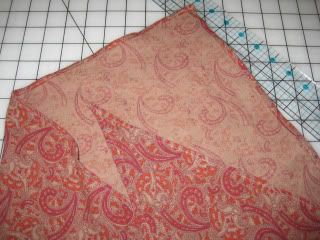
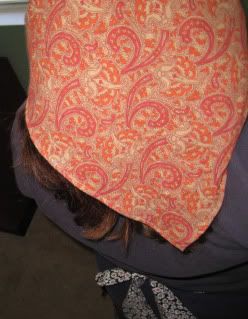
End then you are done -you have a basic triangular headscarf that can be worn many ways  :)


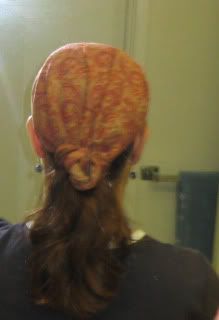
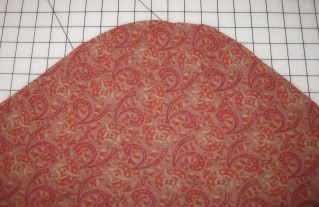
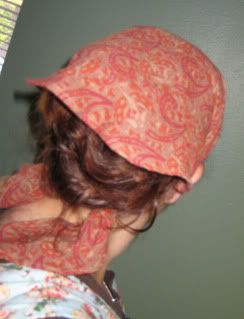
Now, if you want a more rounded veil like scarf, you just cut a little differently. When you get to the point of having a triangle, after making sure it's even, you'll cut a slightly rounded curve at the end that will hang down in the back. I like to do this on the fold to make sure I cut evenly, but you can cut it however you wish. After you cut it, hold it up and look at it, try it on, and see if it is more or less the way you want it (remember you will be hemming it).


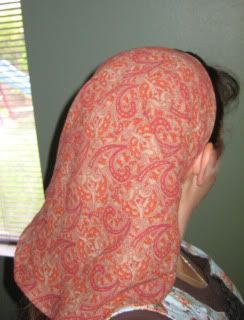
Then hem like you did above and this gives you more of a veil type headcovering.


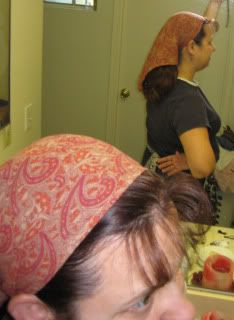
I sometimes wear mine longer and sometimes fold them shorter.

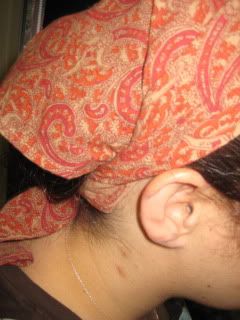
Worn long without any folding.


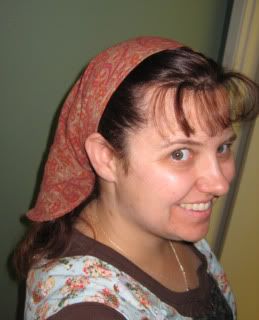
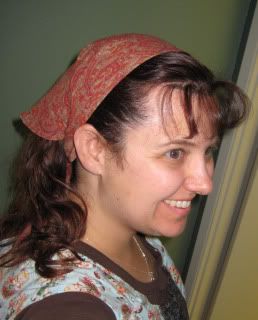
If you fold it shorter and nice style is to twist the ends before tying.


I like this style because it can be worn with the hair up or down.


I hope this helped a little bit. I'll try to add some more instructions on how to sew various headcoverings in the future.

Saturday, August 6, 2011

Grocery Tote Sewing

I love making these bags! The pattern is the Grocery Tote by  Keyka Lou.  She sells both on Etsy and via her store. So far, I've sewn up two of her bags and they are wonderful. Easy and clear directions and not a bunch of stuff that you really don't need to see in her pictures. 

I made these today out of some left over fabric (I'll make another post later this week showing the tunic I made and reviewing that pattern). The bags are reversable and washable. 


Last year I made these at the end of the year for all of the kids teachers. It was great because they got to choose the fabric and personalize them. The teachers all loved that their bags were made with prints in their favorite color or favorite colors (or both). I'm always getting asked where I got the bags when I'm out and about at the stores too. My youngest daughter even has one with pink dogs on one side and Disney princesses on other.


Guinea pig sewing

Yes, you read that correctly.

We have 2 guinea pigs and I had read online about using fleece for bedding. As a mom who has made and used cloth diapers, it's not all that different. I had left over fleece in a container - just waiting to be donated or used.


For the absorbant layer I used an old beach towel for my first one. It's heavy but works. For my second one, I went to The Salvation Army Thrift store and got a bunch of old matress pads for $2 each.  These are much lighter in weight when washed.


I also made them two "cozies" (basically a bag they can climb/sleep in).

Friday, August 5, 2011

Giveaway

Another give-away! at Bakers Royale
$100 Best Buy giftcard.


Good luck!

Thursday, August 4, 2011

Crochet Art

We recently went to the San Diego Children's Museum downtown and they had this large crochet hanging art project near the entry. I tried to take some pictures to show it to you all.


Photobucket

Photobucket

Photobucket

Photobucket

And my children made bubbles! They got to design a bubble blower out of pipe cleaners and then see how well it worked. They also made clay things and their own stencils and paintings from it, but no pictures of that.
Photobucket

Sunday, January 23, 2011

Easy Scrap Blanket Directions


My scraps of sock yarn were building up and I wanted to make something... really anything, but wasn't sure what to do. It had to be simple and not too much thinking. I wanted a mindless project.

Looking through some old knitting and crochet books from my husband's grandma, I found some basic square instructions and just ran with it.

I didn't invent this stitch - It's probably as old as knitting with a circular needle began. Almost anyone who knits and sees this blanket asks me how I did it. So, here are my directions.

I started with 5 dpns and when it got too big for that, I switched to a long circular. Eventually it was so big, I used 2 circulars. Part of the beauty of this project is that you can make it as big or little as you wish. You can use any yarn you like and any size needle.

This example is done with various sock yarns (all superwash, so I could wash it). I'd recommend making sure they are all like yarns, but it could be interesting if you used different weights. I used a size 6 needle for my project.

CO 12 and divide onto 4 dpns (just for the beginning and then I switched to a circ).

Join ends (done in the round)
1: Knit all
2: K1, yo, pm, k1, yo, k1 repeat to start of round
3: knit all
4: K to marker, yo, sm, k1, yo, k to end of needle repeat
-- then I just repeated 3 & 4 it was big enough. Then cast off.

edging: you could just leave it at this point but I wanted a little more. I did 1 round single crochet, 1 row of a loose loop (I think I did chain 4, skipping 1 sc).
Eventually, it’ll be too big for dpns and it was just easier to do on a circ. Once in the rhythm of the pattern, you’ll not need to know when the end of the needle is but you may want to use a different marker for the beg. of a row.
I just kept going with a color until I ran out and then switched. I liked the randomness of just going until I ran out but it would be cool to do it planned and organized too.
When the size you want, just bind off. I picked up a few extra rows on 2 sides to make this more rectangular, but really it probably is better just square (read as, I don't recommend this). I blocked mine when done and I liked the result. If I had made it from acrylic, I'm not sure if I'd block or not.

Happy knitting.

This picture is before blocking but you get the idea.